|
Features
- Recognized note shown in classical notation
- Note names: English, German, Japanese, fixed and movable Do
- High accuracy (1/10 of a cent)
- Over 120 tunings for many string instruments
- Over 20 different temperaments
- Play back function / Sine wave generator
- Frequency Spectrogram
- Timeline Window
- Tuning Map
- Tune with a capodaster, but get your usual result
Operating System
MacOS 10.15 or later
Download
![]()
Supported InstrumentsThere is at least one tuning available for the following instruments:
|
USER MANUAL
Table of Contents
- Overview
- Shortcuts
- Tuner
- How to use the main tuner window
- Settings
- Customize the app
- Connect an Audio Interface
- Change Sample Rate of Your Audio Interface
- Note names
- Tuner Range
- Spectrogram
- Timeline
- Tuning
- Select your instrument and tuning
- Temperament
- Tone Generator
- Tuning Map
Overview
Universal Tuner is made to tune all instruments.
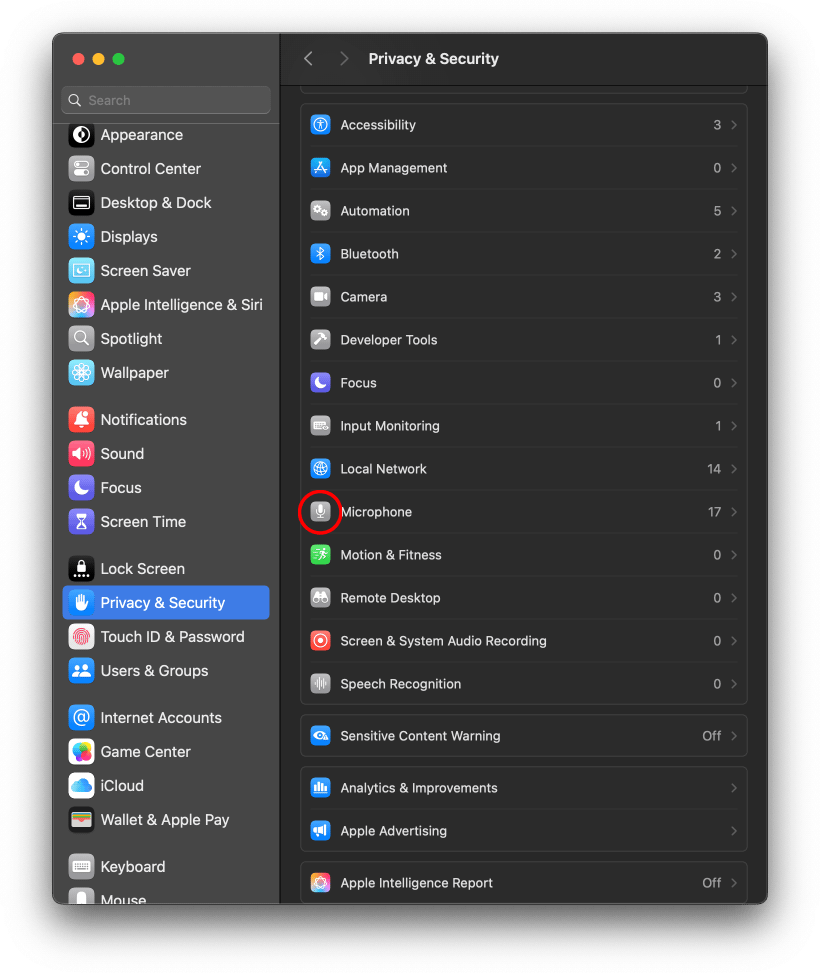
IMPORTANT: When you start Universal Tuner for the first time, you are asked to give the program permission to access the microphone. This is necessary for the program to work! If you denied access to the microphone, you can grant permission later in the System settings. Go to the Security & Privacy tab and click on Microphone. Here you can give the app permission to access the microphone (see Figure 1).
The microphone is only used to determine the pitch. No recordings are permanently stored or used outside the app.

Shortcuts
| spacebar | Start/stop the tone generator | |
| Cmd-? | Open the Help window | |
| Cmd-1 | Open the Tuner window | |
| Cmd-2 | Open the Tuner Range window | |
| Cmd-3 | Open the Spectrogram window | |
| Cmd-4 | Open the Timeline window | |
| Cmd-5 | Open the Tuning window | |
| Cmd-6 | Open the Temperament window | |
| Cmd-7 | Open the Tone Generator window | |
| Cmd-8 | Open the Tuning Map window | |
| Cmd-, | Open the Settings window for general settings | |
| F | Freeze the current reading, if the Spectrogram window or the Tuning Map window is open | |
Tuner
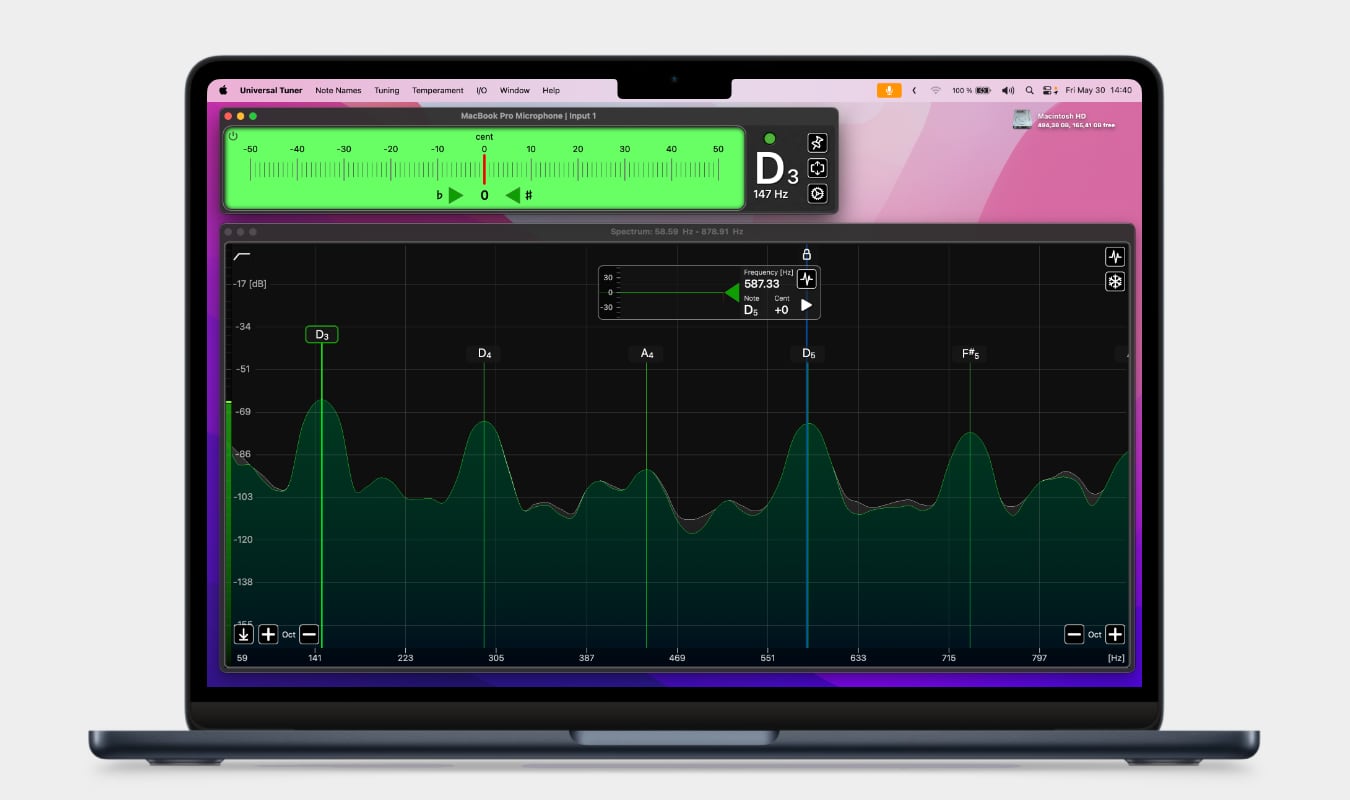
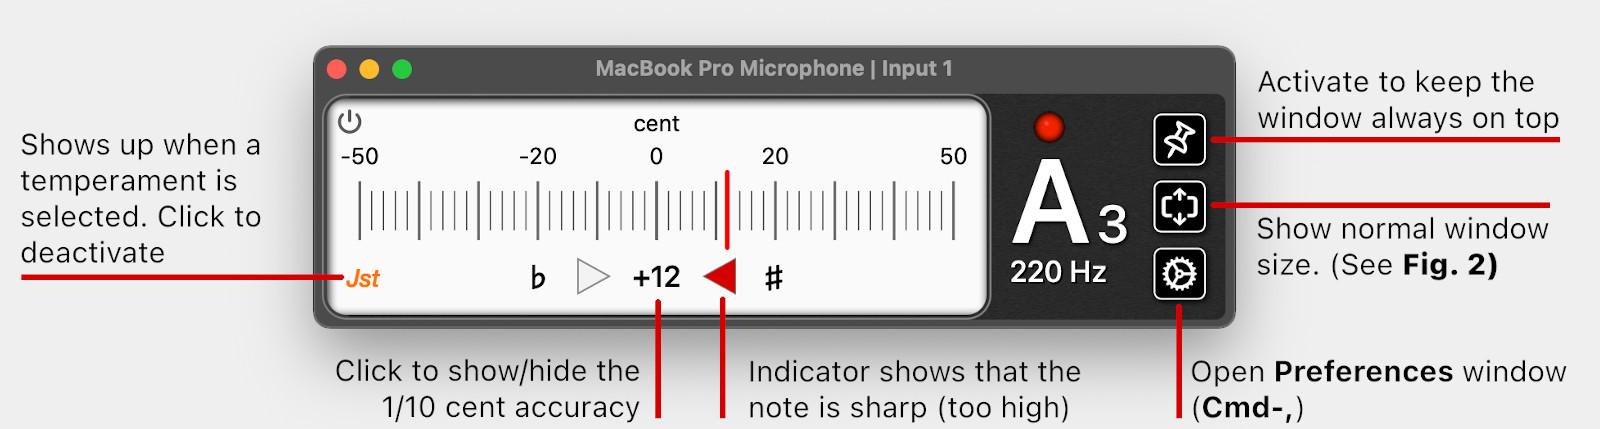
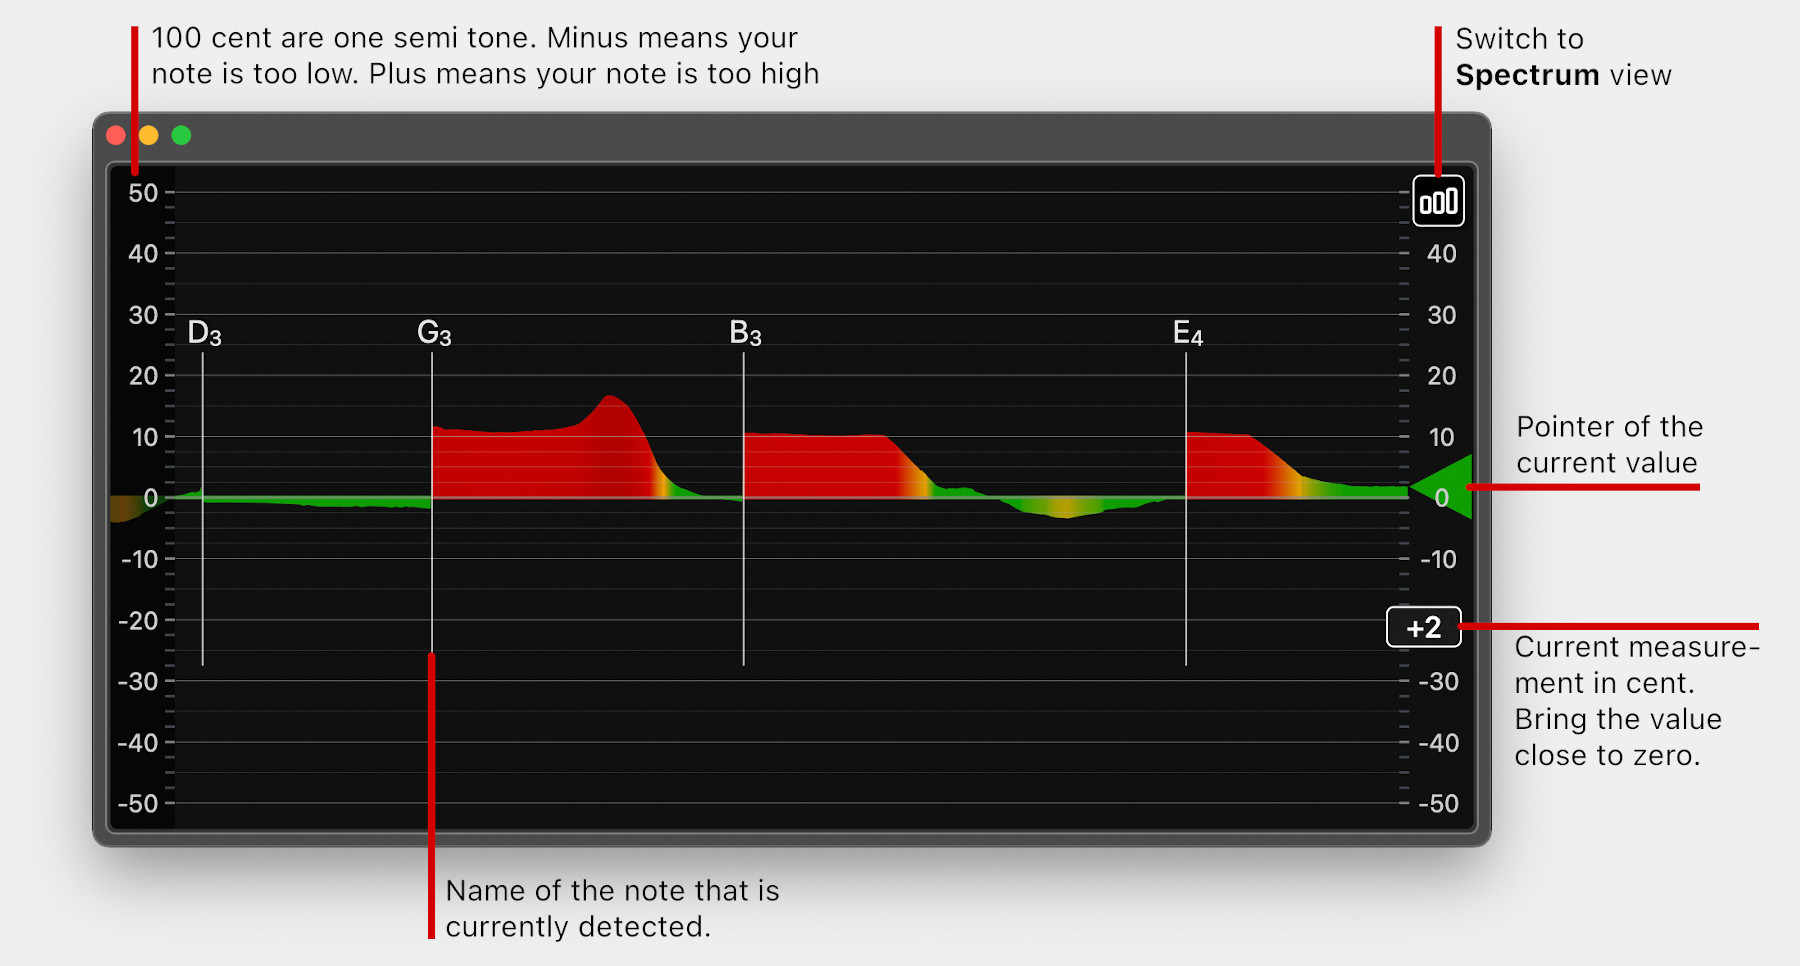
The tuner window (Fig. 2-1) displays the pitch of the played note in cents.
One octave is divided into 12 semitones. Each semitone is further divided into 100 cents.
A reading of zero cents indicates that the played note is in tune. If the cent meter shows a negative value, the note is flat (too low). If the note is sharp (too high), the cent meter shows a positive value.
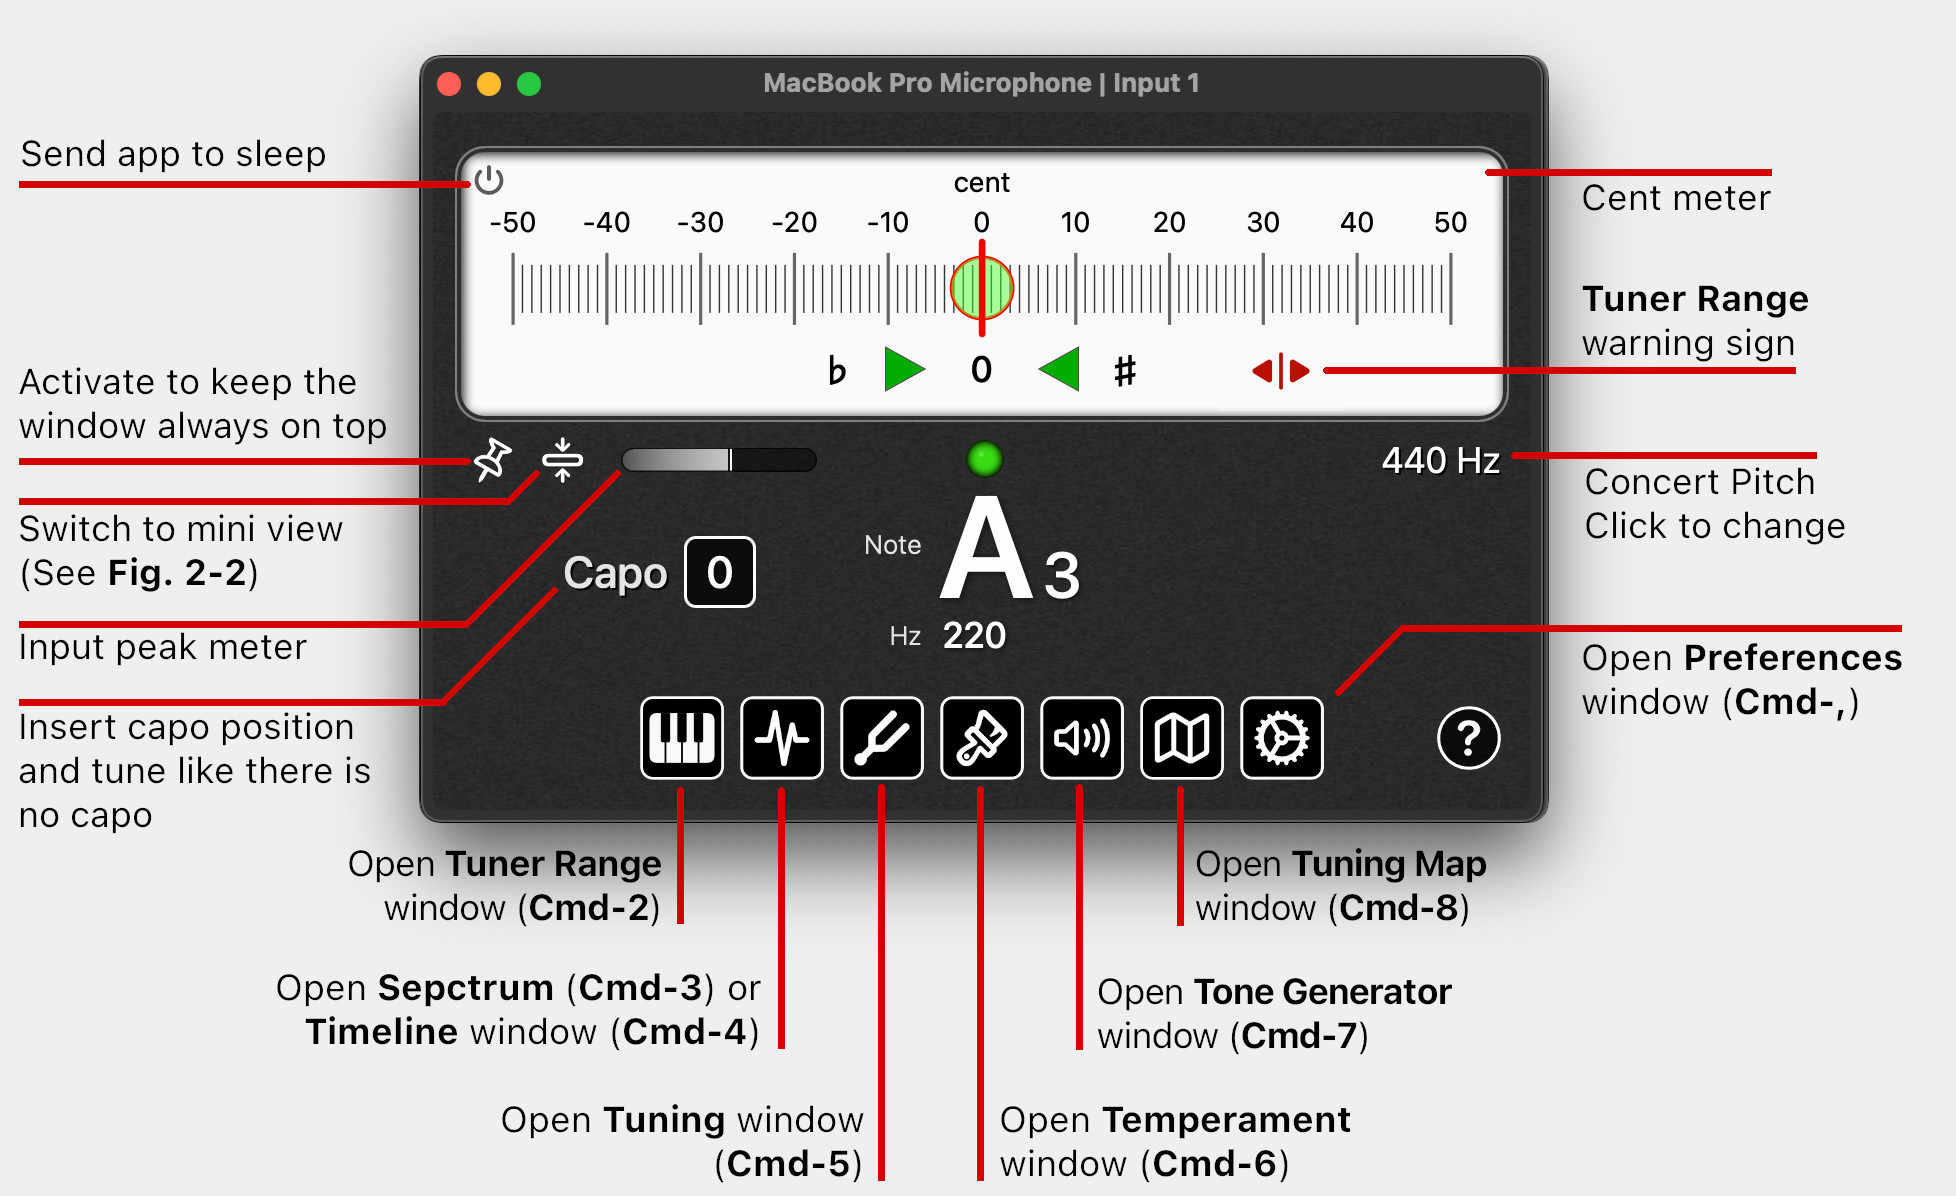
Putting the app to sleep will stop it from using any CPU power. Click on the tuner window to wake the app up again.
IMPORTANT: Ensure that the tone you want to tune is within the measuring range. Otherwise, the tuner may display one of the overtones as the result. Always make sure that the tuner range covers the note you want to measure! (see Tuner Range)
|
|
App sleep
Send the App to sleep and it will use no cpu power. Click on the Tuner window to wake the app up again. |
|
|
Tuner Range Warning
When this sign starts blinking, it indicates that the measured note is outside the tuner's range. Click on the sign to open the Tuner Range window (Cmd-2) and adjust the range according to your needs. (See Figure 4) |

Settings
Connect an Audio Interface
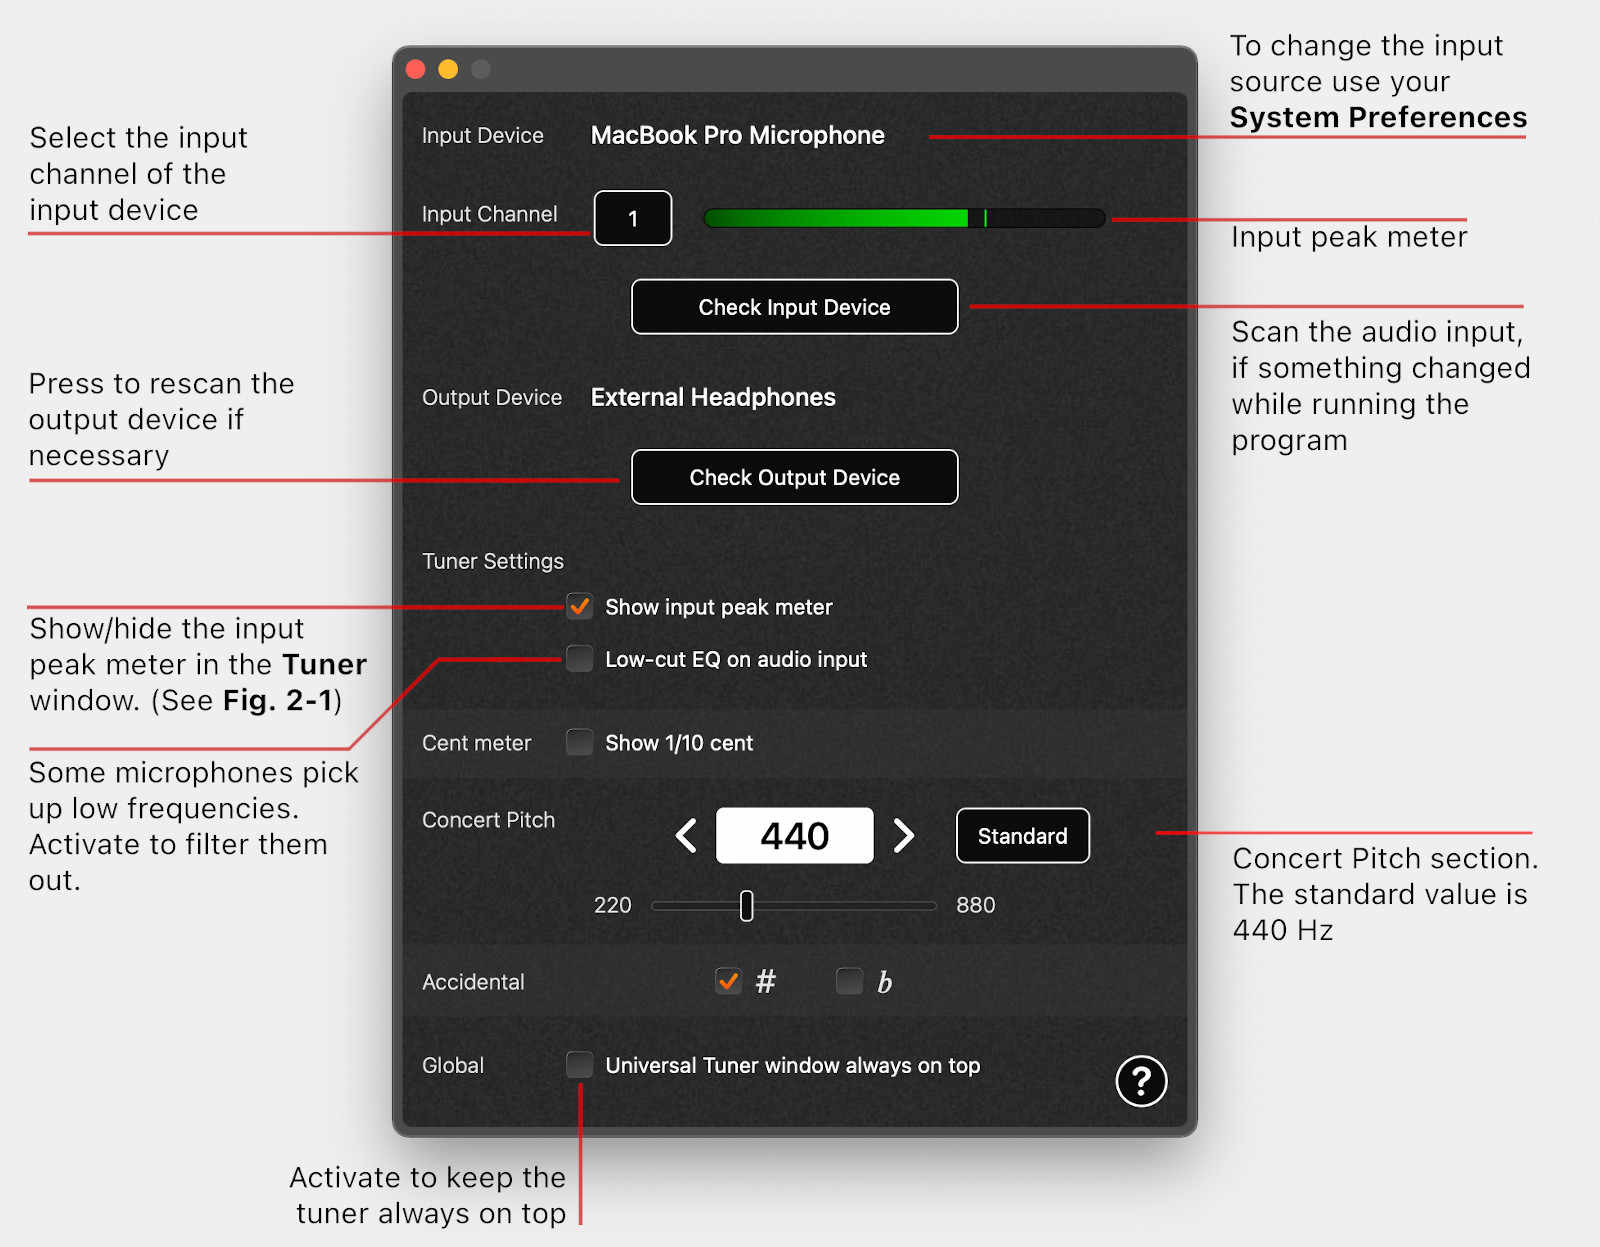
If you want to change the input or output to another device use the I/O menu (See Figure 3-1) or use Apple's System Settings. If the device is not detected properly by Universal Tuner, please press the Check Input Device button.
Set the Input Channel to match the input channel of your audio interface. If your interface is recognized correctly and you play a tone, you should see the signal on the Input peak meter.
Hint: Use the trackpad or the scroll wheel of your mouse to adjust the sliders or the concert pitch.
Change Sample Rate of Your Audio Interface
Go to the settings of your audio interface and select your new sample rate. The change should be recognized by Universal Tuner. If not, press the "Check Input Device" button to reconnect with your interface.

Note Names
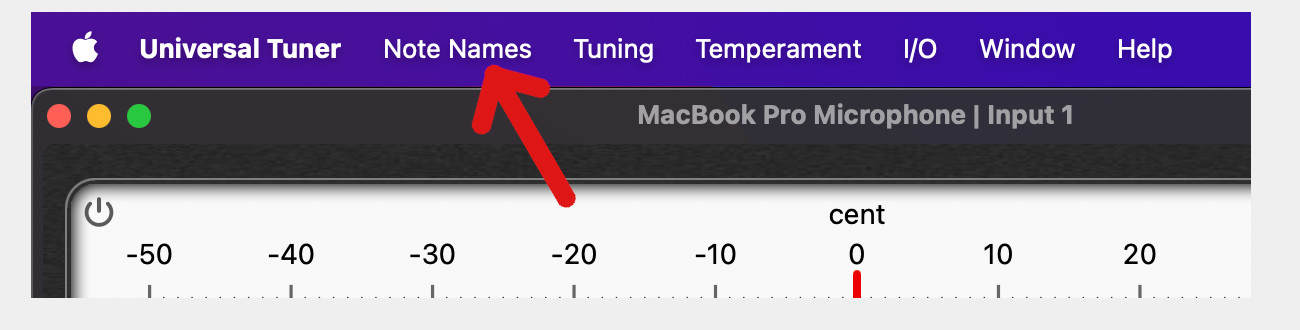
You can set Universal Tuner to different note names. Use the menu "Note Names" (See Figure 3-3))
Options:
- English
- German
- Japanese
- Fixed Do
- Movable Do

Tuner Range
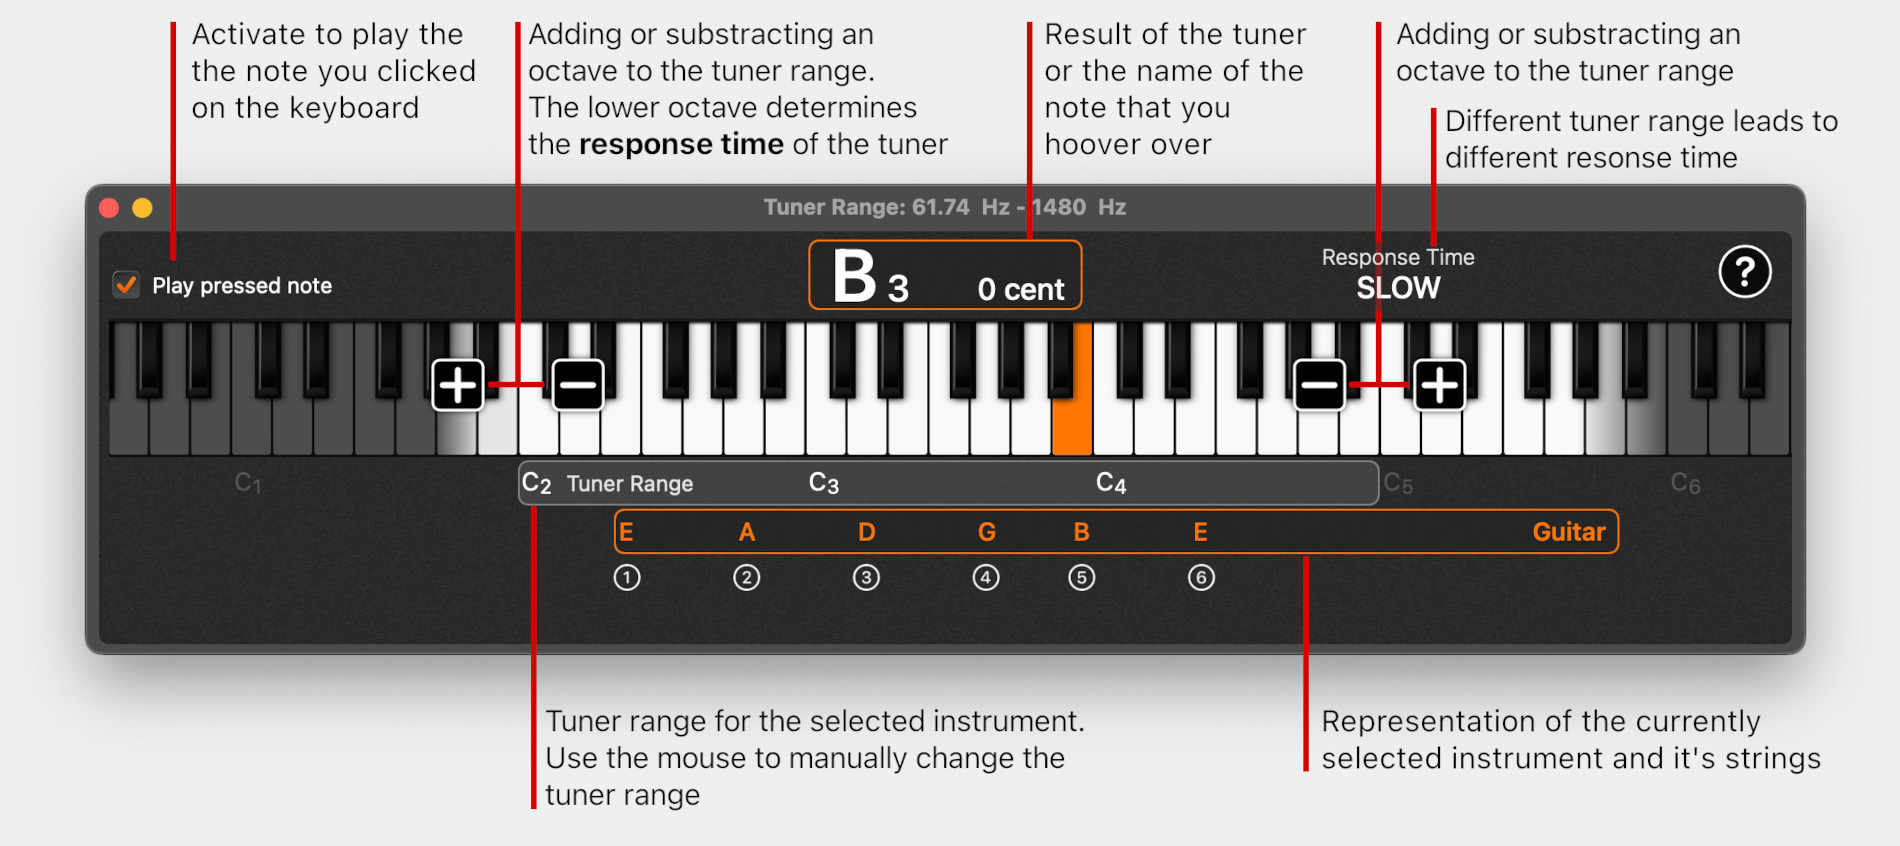
By default, the tuner range is set from C1 to C7 to cover most instruments. Once you select a specific instrument, the range will automatically adjust to match that instrument's range.
Change Response Time
Different tuner ranges result in different response times for the tuner.
You can adjust the tuner range using the + and - buttons.
The lower octave determines the response time of the tuner.
The higher the lower bound, the quicker the response time.
High Performance
Activate High Performance to get even faster response times and more measurement results.
However, the app will then require slightly more CPU resources.
IMPORTANT: Make sure that the tone you want to tune falls within the measuring range. Otherwise, the tuner will display one of the overtones as the result. Always ensure that the tuner range covers the note you want to measure!

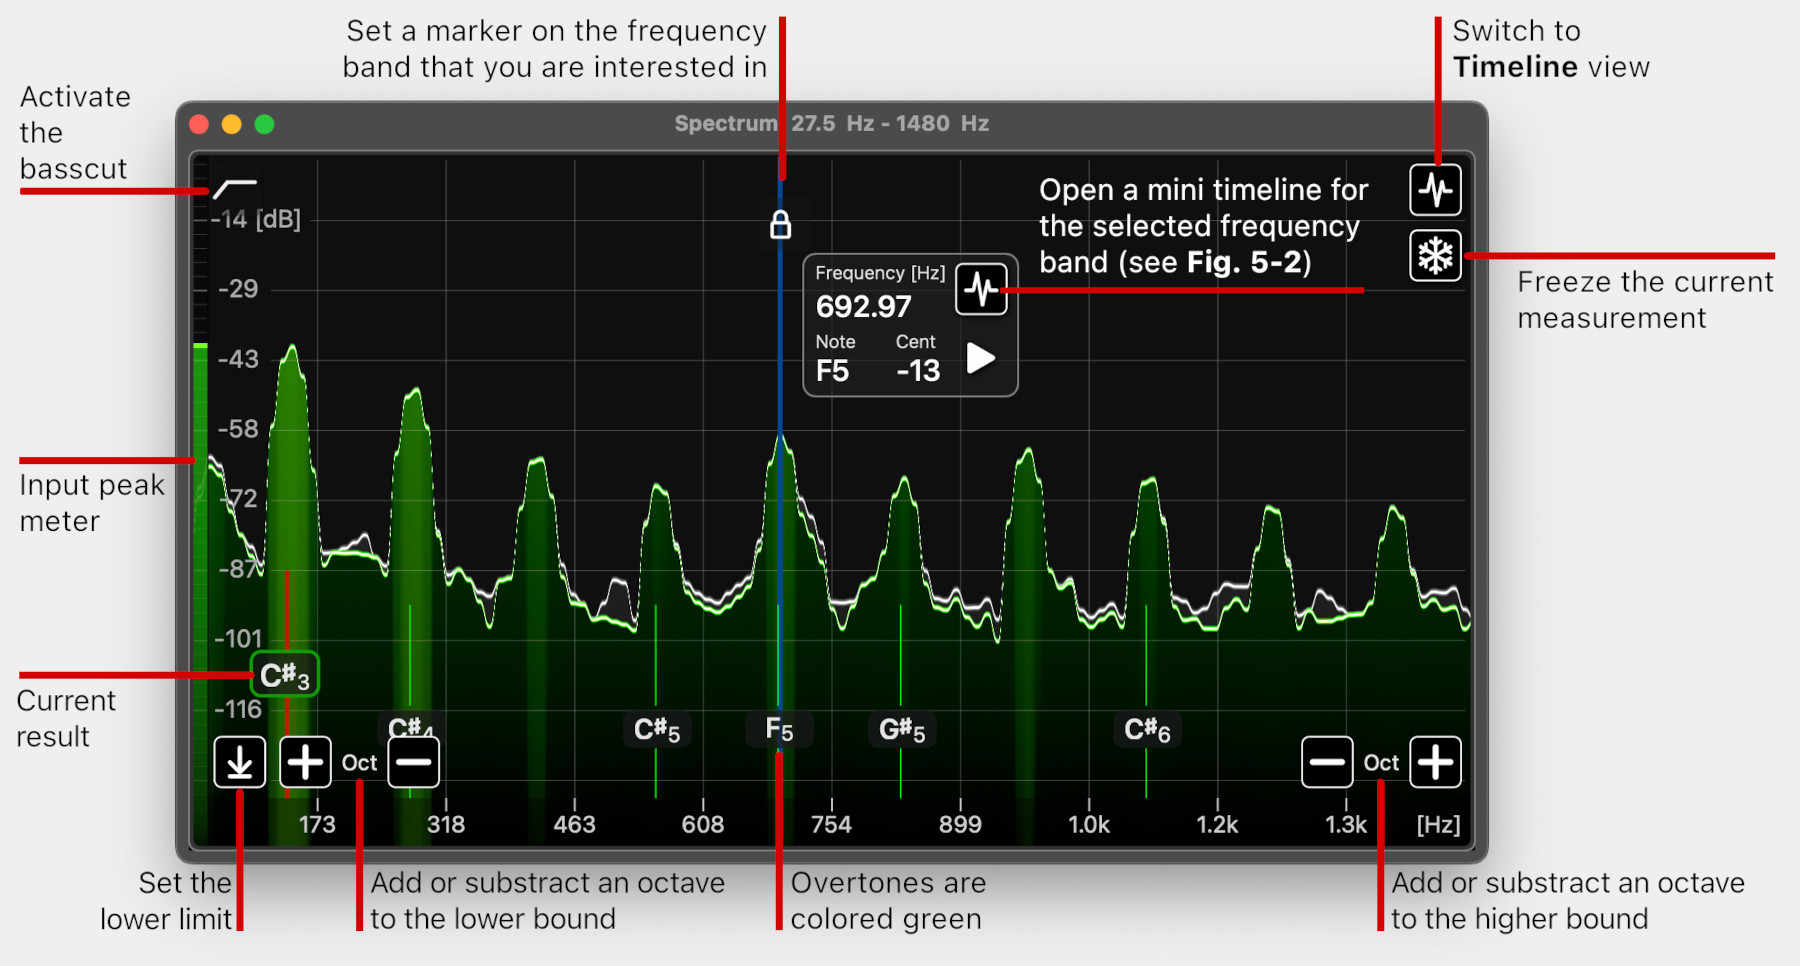
Spectrogram
The spectrogram displays all frequencies within the selected tuner range. To change the range, open the tuning range window (Cmd-2) and select the range you want to measure and display. (See Figure 4)

|
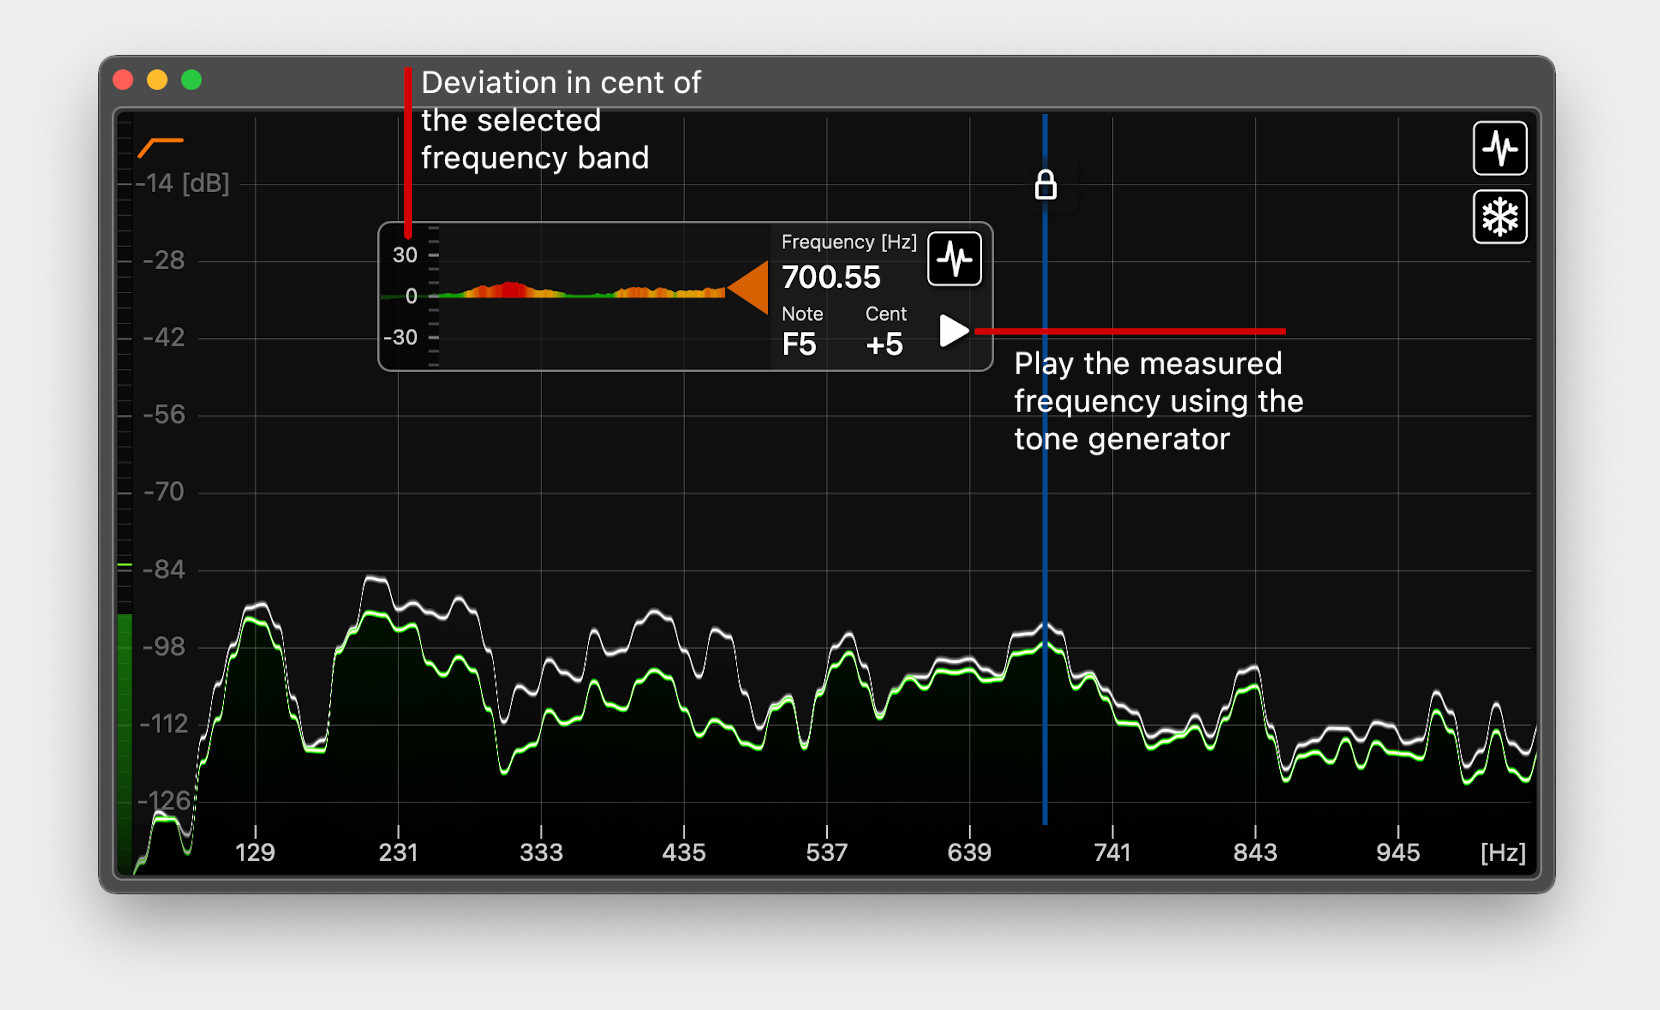
Timeline |

Tuning
Select your instrument and tuning.
IMPORTANT: Selecting an instrument will change the range of the tuner!
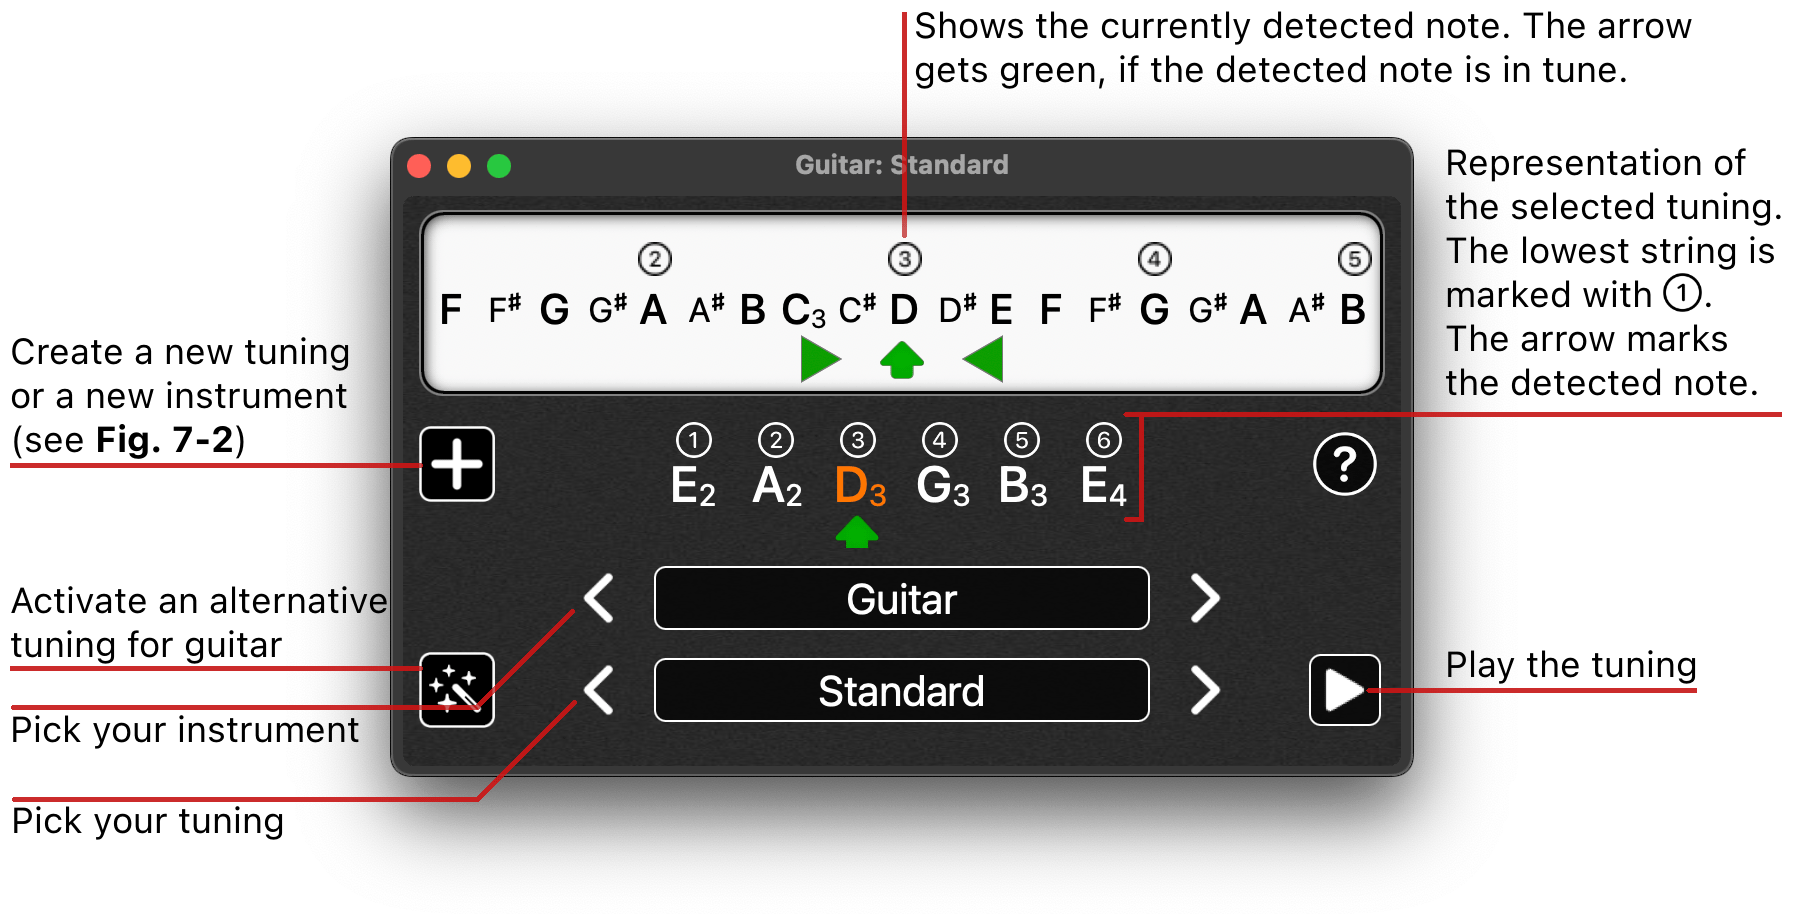
You will see a representation of the tuning as viewed from above, facing the instrument. Starting with one for the lowest string (in most cases).
Use the “Play” button to playback the tuning or click on the string to play its frequency.
Note: If you pick guitar, you will get an alternative tuning option, which can be activated by clicking the “Magic wand” button. (See Figure 7-1)
|
|
Create a Custom Tuning or a Custom Instrument
By pressing this button, you can create your own custom tunings and custom instruments. (See Figure 7-2) |
|
|
Edit your Custom Tuning
Select one of your custom tunings and press the Edit button to rename or modify it. |
|
|
Delete a Custom Tuning
If you select one of your created custom tunings, this button will appear. You can delete the tuning by pressing the button. Important: If you delete the last tuning of a custom instrument, it will also delete the instrument. |
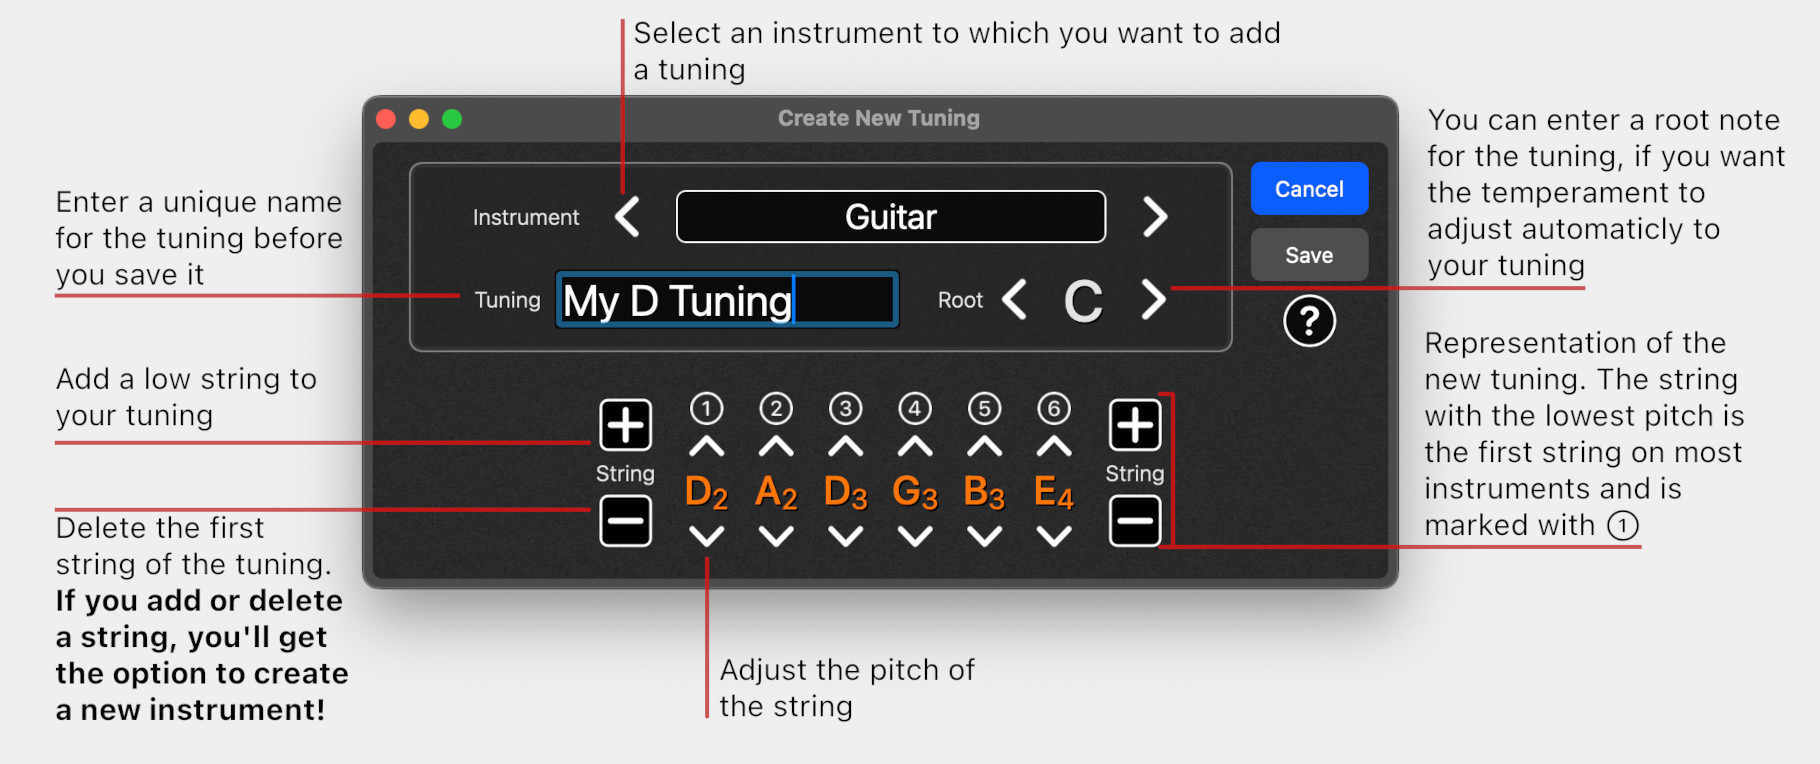
Create a new Tuning or a new Instrument
To create a new tuning, pick the instrument you want to add a new tuning to. Then press the “+” button (See Figure 7-1). This will open a new window (see Figure 7-2).
If you add or delete a string from your new tuning, you'll get the option to create a new instrument.
Entering a root note is optional. If you combine your tuning with a temperament, the root note of the temperament will automatically switch to the selected root note of the new tuning.
If you are not using temperaments, just leave the root note as it is.
HINT: By holding the “option” key and pressing an up or down arrow button, the note of a string will go one octave up or down.

Temperament
The standard tuning in Western music is called “12 Tone Equal Temperament” (12-TET). In 12-TET, all notes are equally spaced throughout an octave. This leads to equal intervals in any key. However, the intervals are not "pure" as they occur in nature.
“Just Intonation” will give you "pure" intervals in relation to the selected root note. But the further you move away from the root note, the stranger the intervals will sound.
Other temperaments try to find a compromise between “Equal Temperament” and “Just Intonation”.
Tip: If you are using an open tuning, set the root of the temperament to the root of your open tuning and pick “Just Intonation”. Give it a try!
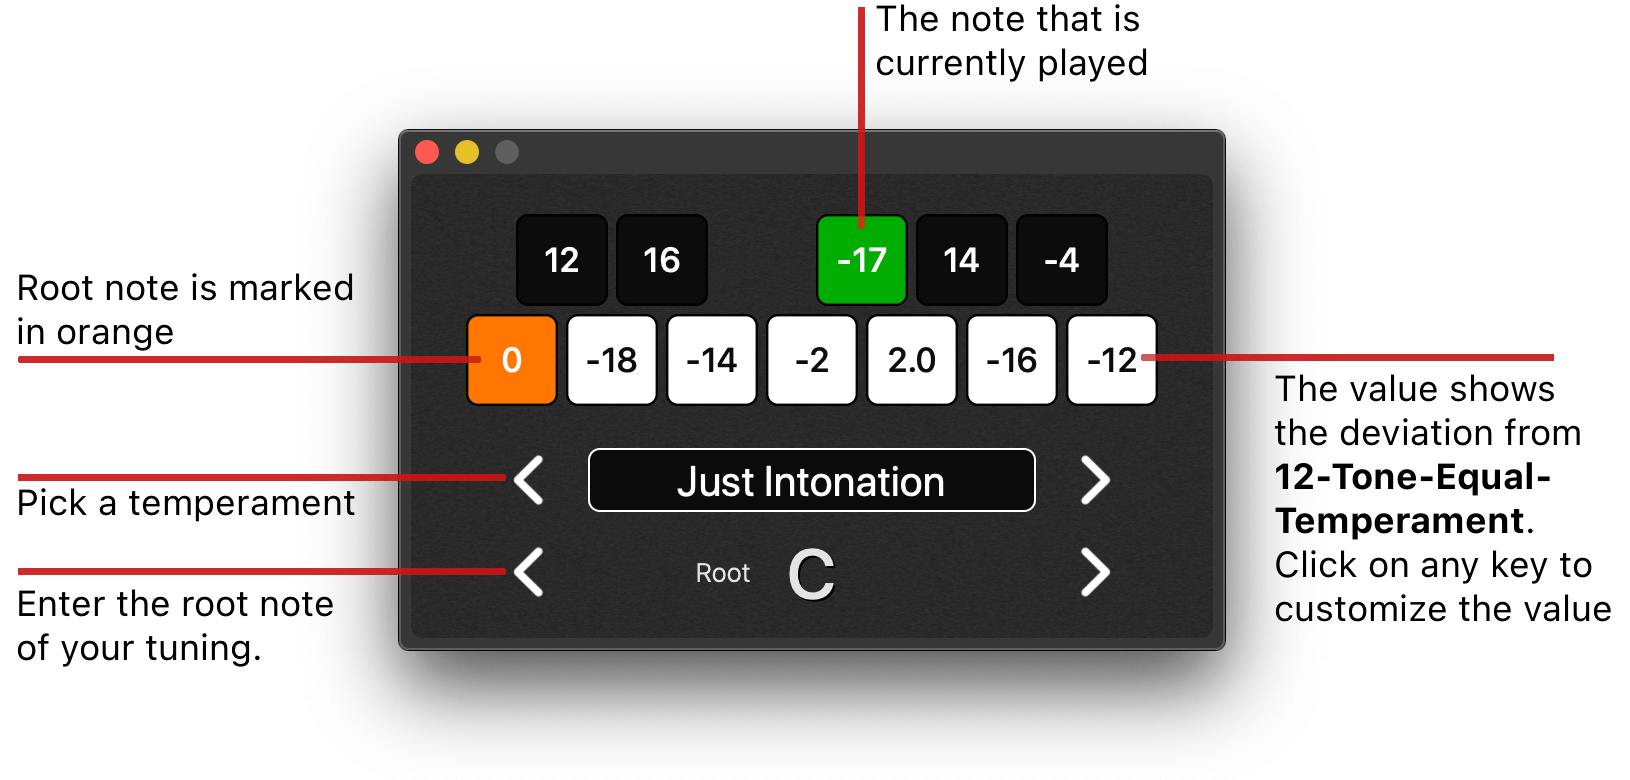
Create and Save a Custom Temperament
Select Custom Temperament and enter your deviations by clicking on one of the 12 note buttons to enter a new value for the deviation (only values between -50 and +50 cents are accepted).
You can change the value of the root note (orange button), but why would you want to do it?
|
|
Save Custom Temperament
If you customize a temperament, this button will appear. You can save your customized temperament by pressing the button. |
|
|
Rename Custom Temperament
Select one of your saved custom temperaments and then you can rename it. |
|
|
Delete Custom Temperament
If you select a saved custom temperament, this button will appear. You can delete the scale by pressing the button. |
Hint: Hover over the root note and use the trackpad or the scroll wheel of your mouse to adjust it.

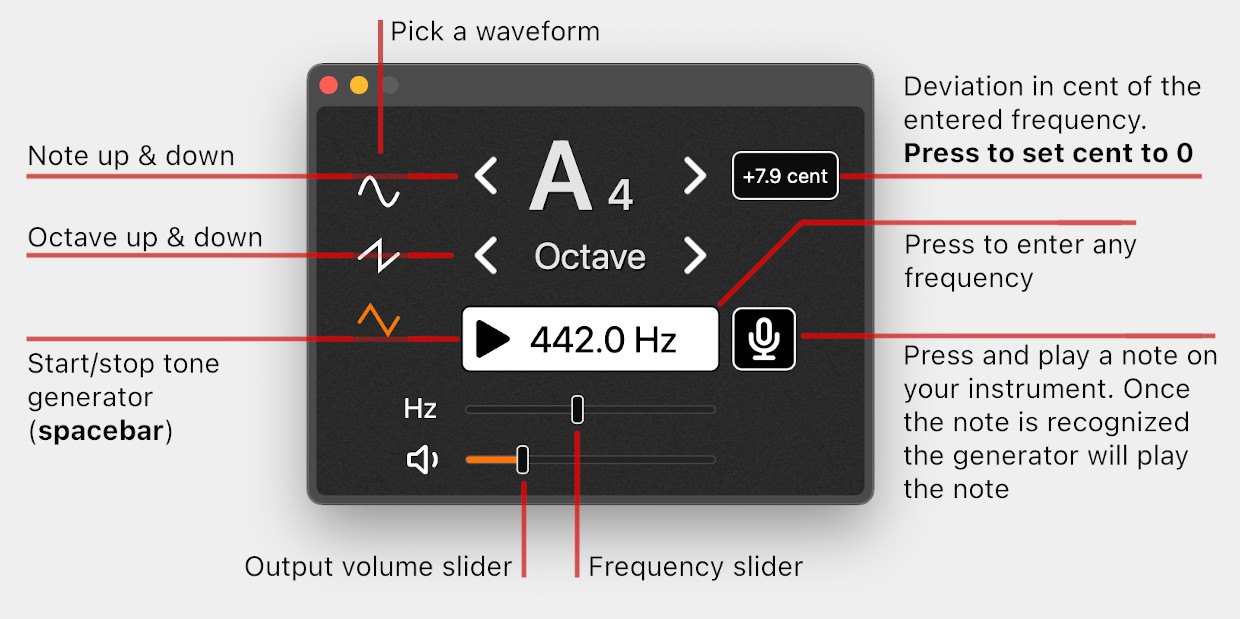
Tone Generator
The tone generator is used when you want to playback a frequency or a tuning. Select the waveform to be used for playback here.
Hint: Use the trackpad or the scroll wheel of your mouse to adjust the volume, frequency, cent value, note, or octave. Just hover over the slider or value.

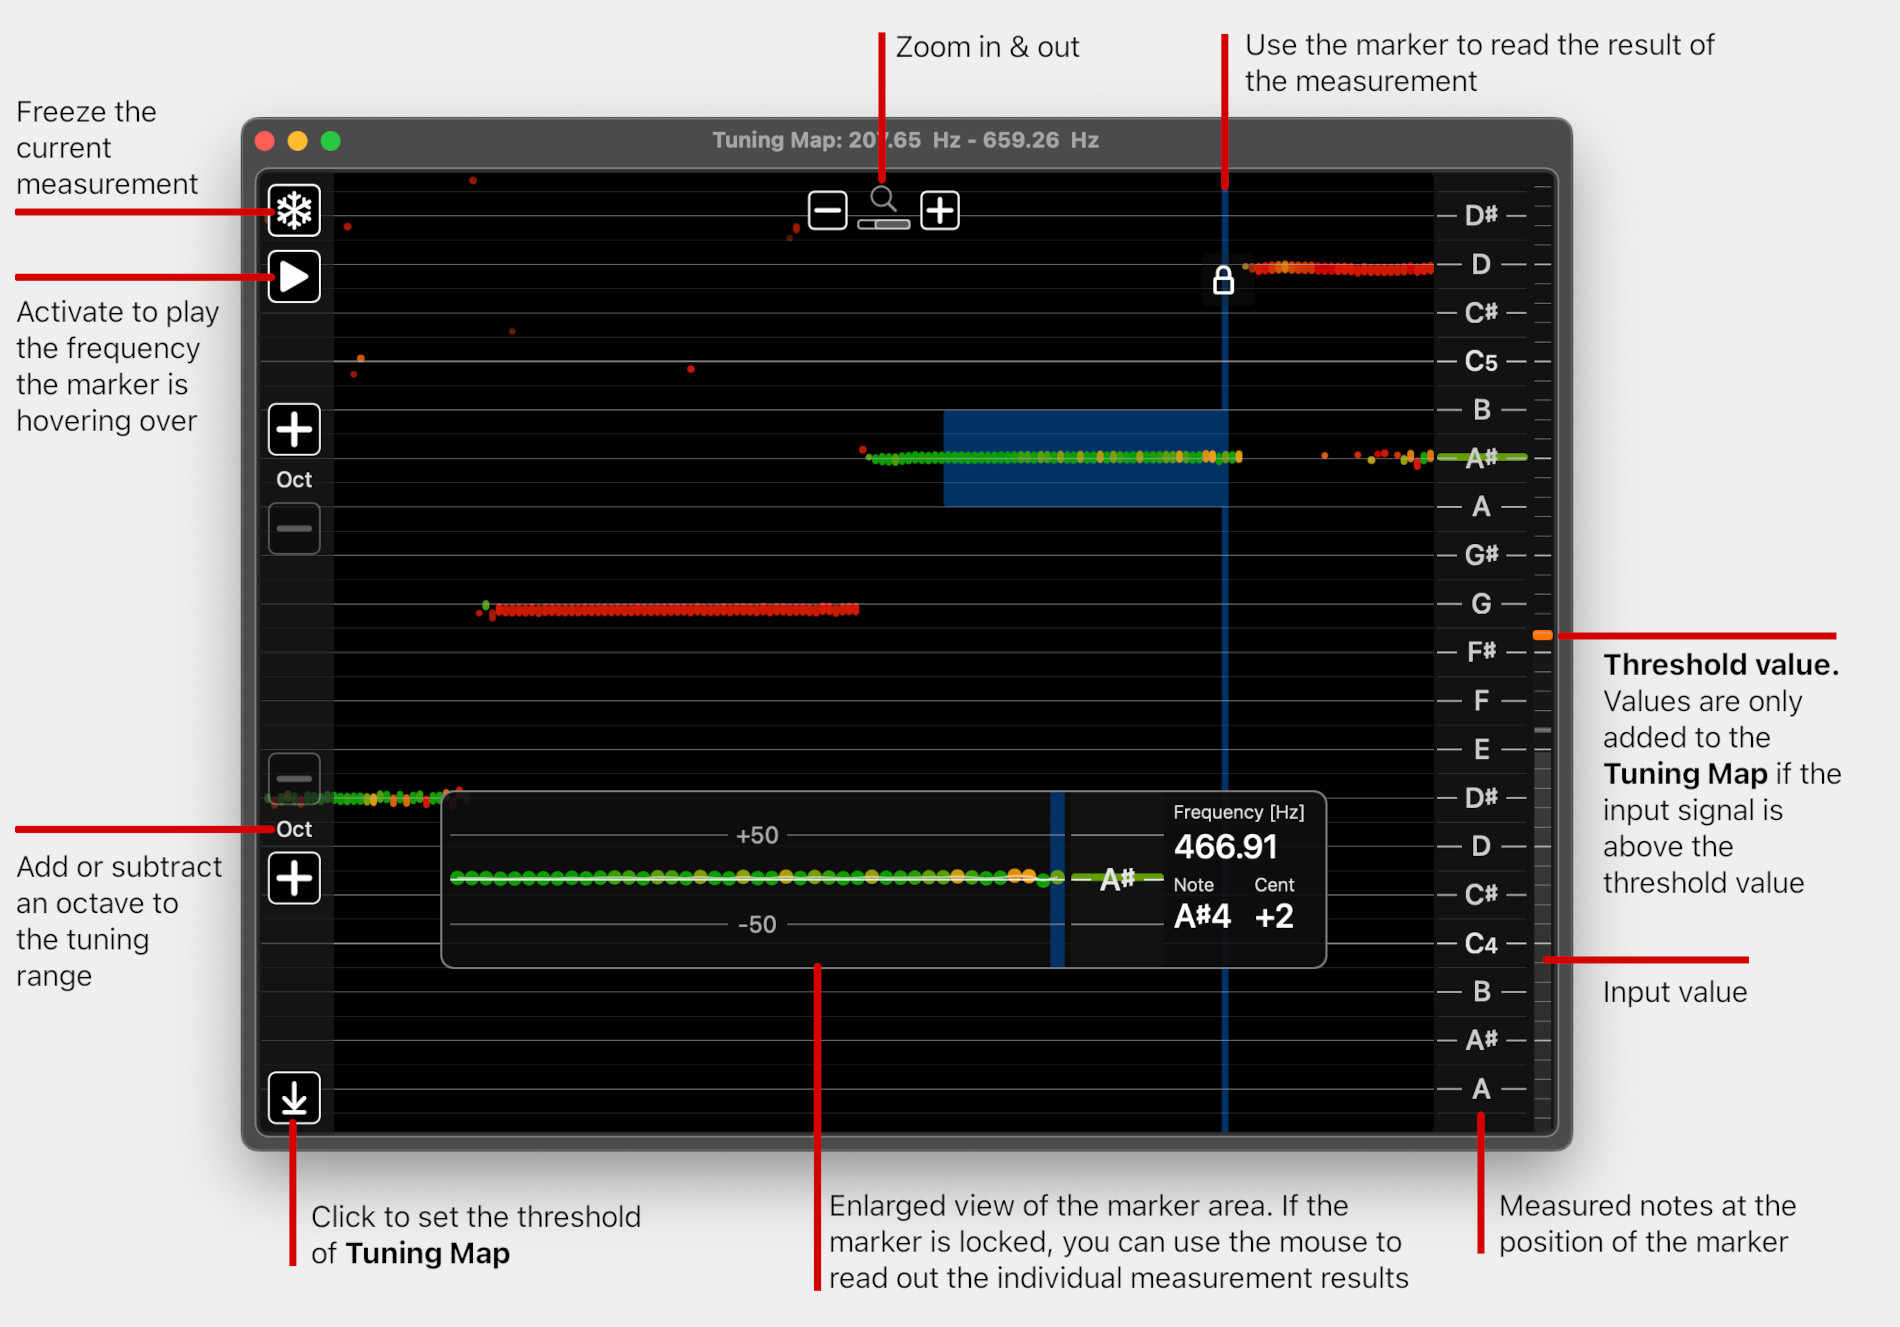
Tuning Map
The Tuning Map is a tool for tuning notes of instruments that only sound briefly. So, if the tuner doesn't show anything yet, you can already read out the pitch in the Tuning Map.
First, use the Octave buttons (see Figure 10) to set the measuring range as precisely as possible for your instrument. Then, set the threshold value so that values are only recorded when you strike a note on your instrument.
Now, you can use the blue marker to read out the frequency components.
UniTuner, universal tuner, MacOs, Download link, Stimmgeraet